Everything that you need to know about move out cleaning
Moving out of your apartment or house is not only expensive but also stressful. Eventually, you need to arrange movers, move out cleaning, pay a new deposit even before you get an old one back, fix appliances, fix any damages and so on. Some landlords can ask for a lot of things to be completed before you can even start a conversation about your deposit. We understand that your relocation could happen under certain circumstances and you might be on a tight budget. We are at Rocket Maids understand that all cases are different and we can help you here and explain what specific things landlords are looking in a move out cleaning.
Kitchen
- We would suggest to start in the kitchen. This is one of the toughest areas in your place even if you’re a very tidy person. Grease and dust could accumulate in the hidden areas that are very hard to reach. For a move out cleaning there are a few things that need to be done that are usually overlooked during a regular cleaning. First of all, use gloves all the time as dry skin and eczema is not a joke even if you use green products.
Refrigerator
- Cleaning can be started with the refrigerator. Remove all food from the refrigerator and trash expired products. Unplug the refrigerator and let it defrost for some time, then remove all the shelves that can be detached and clean them separately in the sink. You may use a sponge and soapy water to clean inside refrigerator and freezer. Don’t use too much water otherwise it would be difficult to collect it once clean. You may use microfiber rags to dry wipe inside fridge and freezer. Microfiber rags are very effective (though you may find them pricey) and can absorb water, spills and dust. You may purchase a pack of microfiber in your nearest store or on Amazon. Place all shelves back and plug the fridge back in.
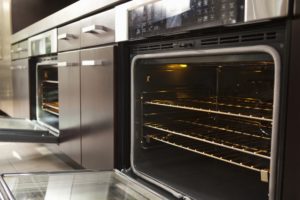
Oven and stove
- You may continue with the oven and stove. Use your preferred oven cleaner and follow the instruction on the bottle. For example, Easy Off Fume Free is very good and doesn’t contain any fumes. Spray it evenly in the oven and leave it for an hour or so. Then use scrubbing sponges to remove old grease/stubborn dirt and clean the oven with microfiber towel and water. For very tough spots use wet Pumie Scouring stick and within a minute your oven will sparkle!
- While oven cleaner is sitting in the oven, clean the stove using degreaser and a scrubbing sponge. For tough spots use oven cleaner (absolutely safe to use on the stove as well). Proceed with cleaning the vent hood above the stove and make sure that the light bulb is in working condition. Take all removable parts and soak them in soapy water for 30 minutes, then scrub them and wash properly. Wipe all surfaces with a dry microfiber cloths.
Dishwasher
- Cleaning and desinfecting dishwasher. Pull out the lower rack and clean the bottom of dishwasher. Fill a cup with a vinegar and put it in the dishwasher and run full hot cycle. You will be able to disinfect the dishwasher and remove all bad odors.
Cabinets and surfaces
- Removing EVERYTHING from the kitchen cabinets as this will help you with the move out cleaning. Using all-purpose cleaner (choose your favorite one), clean inside and outside of the cabinets. For a tougher spot, use a household degreaser.
- Cleaning windows if you have them is the next step. Start with scrubbing window tracks. You may use a vacuum cleaner with a narrow attachment to suck off the dust first. Then, using a toothbush and all-purpose cleaner, scrub all corners very well. Also use microfiber towel to make them look like new. Using glass cleaner, clean windows with a cotton rag.
- Using all-purpose cleaner and a sponge, clean the countertops and wipe them with microfiber and cleaning solution that suits the material of the surface.
- Last but not least – wash out the sink. Try to use a brush to scrub around the edges of the sink and sponge with soap to clean the sink itself. Use bleach for a tough spots, especially on a porcelain sink. You may buy paste-like bleach that can be left on the spot for a few minutes for easy cleaning process.
Bathroom
Do you still have any energy left? 🙂 Then we’re moving to the bathroom!
- First step is the bathtub/shower. Consider using Barkeeper’s Friend with a wet sponge and some elbow grease. Los Angeles is known for it’s hard water so some stains are unavoidable. Use a hard brush to clean the tile on the floor. Use a cleaner with bleach for a better results.
- Clean any drawers and cabinets inside and outside. Clean mirrors and backslash. Countertops should be cleaned at the end.
- Check ceiling for any spots. Humidity can accumulate on the ceiling and create some spots that can be easily removed. Use a ladder to reach the ceiling or corners.
- Next step is toilet cleaning. Squirt toilet cleaner along the inside of the toilet’s rim and scrub down the bowl with a toilet brush. Flush it all down when you’re done. If you have hard water rings you can use Pumie Scouring stick to remove them (yes, it’s the same stick that could be used in the oven 🙂 Wipe the toilet with microfiber and all-purpose cleaner. Please don’t forget about base of the toilet and wipe it as well!
Bedroom and living room
Take a break and have a Twix 🙂 We are coming to the last part that is the easiest of them all
- Start with cleaning windows. You may use the same method as described in the section about kitchen. Just remember to clean blinds if you have them.
- You may now proceed to the closet cleaning. Make sure that it’s empty and there is no trash and your belongings have been removed. Wipe down all shelves and pay special attention to the corners as they can accommodate a lot of dust. Don’t forget about mirrors on the closet if you have them. We would recommend to use HDX glass cleaning spray that is available in your nearest hardware store. It has a nice minty smell and does a great job leaving no streaks on glass or mirrors.
- Wipe down ceiling fans (they accumulate a lot of dust, so be careful) and walls. You might be able to remove some old marks from walls with the help of melamine sponge that is available in every department store. Please use such a sponge very gently on the walls since the paint might come off. After the move out cleaning, your landlord most probably will repaint walls anyway, so don’t panic and there are spots left. This is considered as ‘normal wear and tear’.


Final steps
- Light switches and electric sockets needs to be cleaned and degreased.
- Dust and wipe all baseboards in your place. Some might require extra work so use sponge and soapy water to clean them well.
- Vacuum the whole house and then mop floors where needed. Finally, this is the last step of the cleaning process. Make sure that you do floors when everyone is out of the apartment/house and everything is moved away. Start from the furthest room in your place and work towards the entrance.
- Last but not least – take pictures of the job done with a date and time stamp. If your landlord or prospective tenants would have any concerns you would be able to show them that the place was cleaned and you have the proof.

Always keep in mind that the place will never be like new again even with a very detailed and thorough cleaning. Therefore, steps that are described above are general guidelines for a move out cleaning and it’s the standard list of things that are required by the landlords.
If you feel overwhelmed with your move out and need a help with your move out cleaning, Rocket Maids would be happy to help you! We guarantee that you will love the result and you can cross a move out cleaning from your moving check list!